


Discover everything you need to know about The Marrow walkthrough in Hollow Knight Silksong, including all the objectives to complete in this region.
The Marrow is an early-game area in Pharloom and offers challenges, quests, and rewards. The region is filled with numerous enemies, like Bell Beast, and defeating them can be challenging. Start your journey from Moss Grotto and exit Bone Bottom to enter The Marrow.
Acquire the Marrow map from the Shakra to learn the map layout to make progression quick. Bell Boss is the final boss in this region, so unlock the Skillspear ability before encountering it. In this guide, we’ll discuss The Marrow in Hollow Knight Silksong, including some tips and tricks to complete every task.
Interact with the Sherma
Exit to the right after resting on the village bench and talking to every NPC over there. Continue moving to the right in the room next to you. You can come across an NPC at the end if you keep moving. This NPC is called Sherma and wants you to open that gate behind her. She believes that only singing can open the gate to be opened. Find a way to unlock this gate, allowing you to progress.
Unlock The Gate
Unlocking the gate requires you to complete the gauntlet. Follow the path that’s turning to the right. Here, you can choose to drop down or move upward. Dropping down allows you to land by Sherma. Watch out for the skill creatures that will try to attack you if you get too close to them. At the top, you will encounter the big creature that can be eliminated by jumping over it.
Keep moving to the right till you find a ground-level ledge. Here, you create a path to the dark area by just hitting the wall. Pass through the platforms over there till you find yourself at the end. You need to take a rest at the bench, as deadly boulders are waiting for you ahead. At the end of the path, you will find Rosary Beads caches. After that, exit into the previous room.
Instead of moving right, keep heading to the left this time. Be aware of the flying enemy that can attack you. There’s a bug hole where you need to drop down. Use your weapon to eliminate mini-gauntlet enemies in this arena. You don’t need to be scared of them, as they are low-level enemies of The Marrow.
Two paths will appear after you kill all the low-level enemies. The first useless exit is on the base level, and the other one is on the top left corner. If you want to get to the area where you were, then take the left-hand path. Continue your journey by dropping down from the hole and heading to the left. This path will lead you to the other side of the gate from where you can unlock it. Hit the level to unlock the gate. Talk to Sherma and enter the next room on the right.
You can open the gate by simply hitting the lever available on the ceiling. After that, speak with the Sherma to proceed. Move to the next room available on the right side.
Encounter the Fleas
Give 30 Rosaries to activate a Bench after investigating the ornament in this room. There’s even more lore inscription available on the right of the bench. Keep moving till you enter the next room. Following all the above steps allows you to enter The Marrow, the second region of the game. Touching the lava can deal 2 damage per dunk. You will find three different exits in this room, so choosing the right one is crucial. The exit on the right will not take you anywhere, so you skip this option. The other two exits are available on the left and right at the top.
We recommend you choose the exit on the top-right by using the ledge to climb. The little wooden sign of a wheel indicates that you’re on the right path. Keep moving till you enter the room next to you. Here, you will encounter a happy porcupine creature, so you need to dispatch them. Use the ledge on the left, and you will come across other Fleas. Fleamaster Mooshka leads these people, so you need to talk to him. Speaking with him allows you to activate the quest and travel back to the Fleas that are lost. It’s best to rest at the bench to save the game and restore your HP.
Obtain Shard Pendant
You need to reach a ledge on the wall to the left by using the platform to the right. Use the weapon to attack the wall, allowing you to unveil a new secret path. You will encounter several enemies there, so take them out and move to the end to acquire Rosaries’ cache. After obtaining the Rosaries, move back to keep climbing.
Move to the right to get to the end after reaching the top. Here, you can collect Frayed Rosary String on the right side near the spikes. After that, you need to move to the left to enter the room next to you. You will come across a long vertical passage. You don’t need to take the exit that will take you to Fleas, but you will take the exit that allows you to get your bearings.
Drop down the ledges, and you will encounter a skill enemy that will attack you in the first place. You can now get your hands on the Shard Pendant tool if you take the left exit that leads to a small, darkened room.
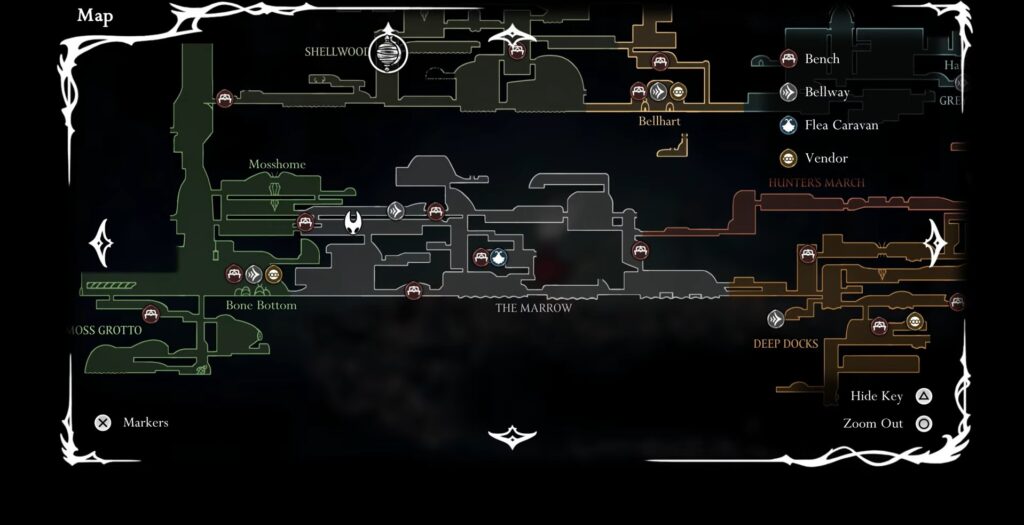
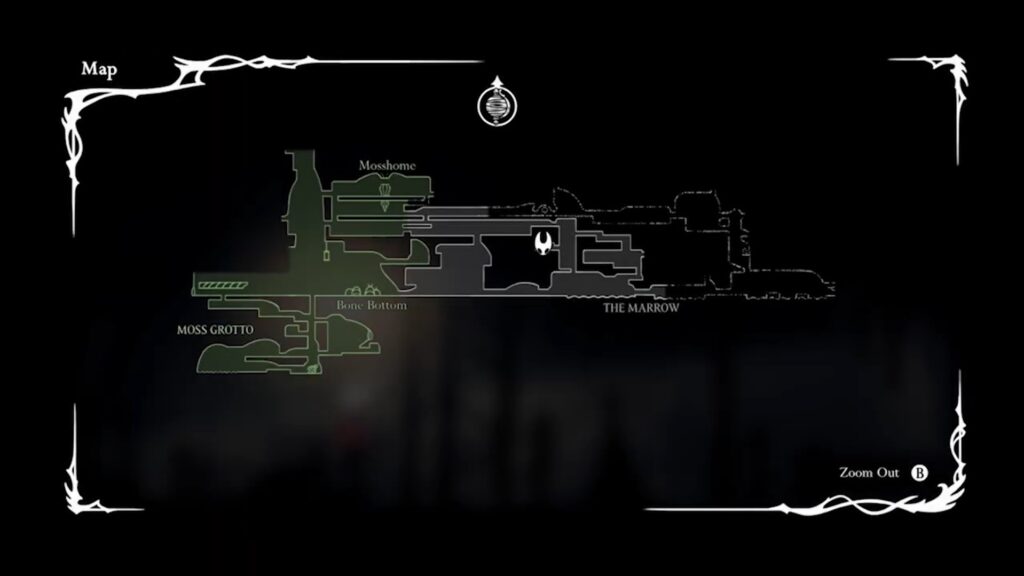
Purchase The Marrow Map

Exit the vertical passage to move upward via platforms. Exit to the left to enter the next room. Shakra in Hollow Knight Silksong is also located at the top left section near Mosshome in the Marrow area. This is the first place where you will encounter Shakra for the first time and acquire the first two maps. Moss Grotto and the Deep Docks are connected to The Marrow. This area has a rocky terrain underneath and deadly enemies. Surfaces are the only thing that differentiates between The Marrow and Deep Docks.
Drop down using a hanging chain, allowing you to acquire Rosary cache. Keep moving to the left and find the lever. Use your weapon to hit the level to lower the platform. First, you need to move to the upper ledge and climb to the top ledge. The platform will drop into the lower room, but don’t get inside. If you enter that room, you will arrive at the starting area.
You need to move to the room on the left, and you will hear the singing sound. Follow the sound and you will meet Shakra. You must purchase The Marrow map, allowing you to learn the layout of this region. Purchasing the Compass enables you to display your position on the map.
Unlock the Bench on the Left
You can find two different exit paths from Shakra’s location. The first one is upward, and the second one is on the lower-left. Unlock the bench after taking the lower exit path. You will get confused that you’re back in Moss Grotto if you enter the next room. However, this location is just above the Moss Grotto in Hollow Knight Silksong. Get ready to eliminate the Pilgrim enemies over there. You can find Rosary Beads from this room, so make sure to collect them. Use the platform to move upward and follow the path till you get outside of that room.
Here, you will come across another bench. Rest at it and attack the lever above and then to the right to unlock the path to Shakra’s location.
Use the Elevator To Get Inside the Village
Traveling to the left side of the bench allows you to unlock the shortcut in this area. Make your way back to the top of the ledges and look for the upper ledge on the left side of the room. We recommend doing pogoing off to the flying creature. You can exit the room and quickly come back to respawn the enemies if something goes wrong.
Find the way to exit the room and drop down after getting on that ledge. Loot the Rosaries available in this area and approach the elevator. Unlock the elevator by hitting the available lever over there. Use the elevator to get inside the village below.
Find Hidden Spool Fragment
While moving down to the village using the elevator, you need to move to the right at the top level. Use your needle to kill the flying creatures over there. You can get your hands on the Rosaries caches after you take the path to exit the room available on the right side. The spike traps will be activated if you cut the ropes in this area.
You can find the first Spool Fragment by hitting the wall below the Rosary cache and entering a room. This Fragment allows you to boost your capacity of Silk in Guage.
Explore Mosshome
Make sure to explore the room above Shakra’s location thoroughly to uncover all secrets. Travel back to the elevator, and you will encounter a flying glowing insect. You can either avoid it or choose to attack it to obtain Mossberry from it. Drop down into the village multiple times and get to the top by using the elevator.
Move in the upward direction via the elevator and approach the bench you already rested upon. After resting at the bench, you need to get through the hole available in the ceiling. Finally, you have entered the Mosshome that just looks like Moss Grotto. There are more deadly enemies in this area that will try to attack you to create resistance in your journey.
Move to the right and you will encounter a giant creature. Take out this large enemy who is trapped in a web. You can meet Sherma in this place if you travel back to this location later in the game. Get to the ledge to move up after moving to the left. Be aware of the Pilgrim enemies, as they can be very challenging.
Hit the level on the left side of the room, allowing you to unlock a shortcut. A hole will appear below. Move inside to loot the Rosary Beads that are available between the lever. Now, you can exit the room from the top. The next room you enter will provide you Choral Commandment. All you need to do is hit the wall on the left, allowing you to locate the hidden ledge.
Obtain Silkspear Skill
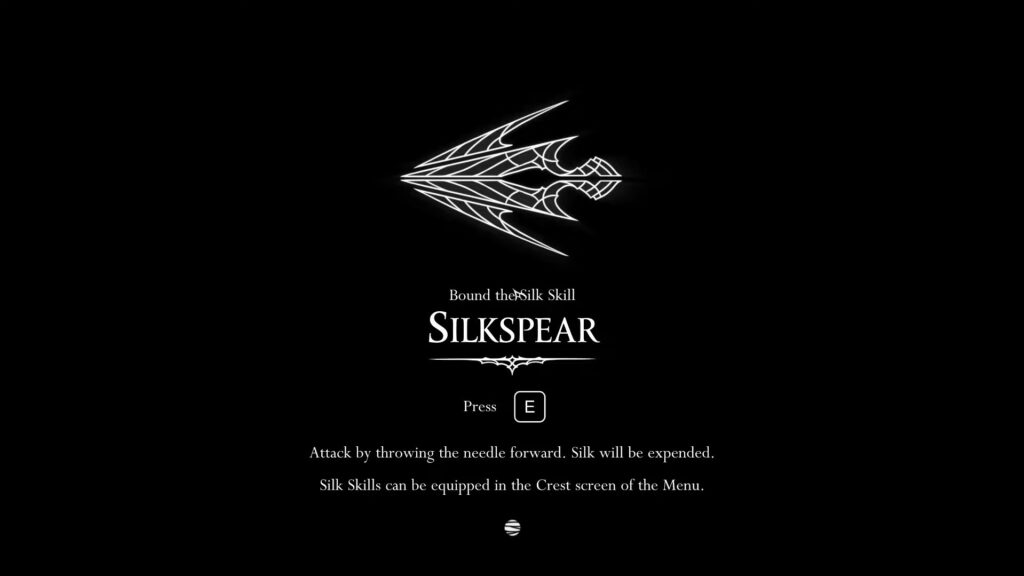
You need to move inside the next room, so travel back to the right from the cliff edge and avoid the traps. There is an inscribed plaque just to the right of the ground. Get your hands on the Rosary Beads in the top right corner of this room. Eventually, you will reach a monument after moving to the left of the room. You can unlock the Silkspear by interacting with the monument and holding Bind.
This ability allows you to throw a powerful ranged projectile and break through the webbing you encounter during the journey. After acquiring your first skill, you need to travel to the left of Mosshome. There are some barriers that you can destroy by using the Silkspear.
Defeat Bell Beast
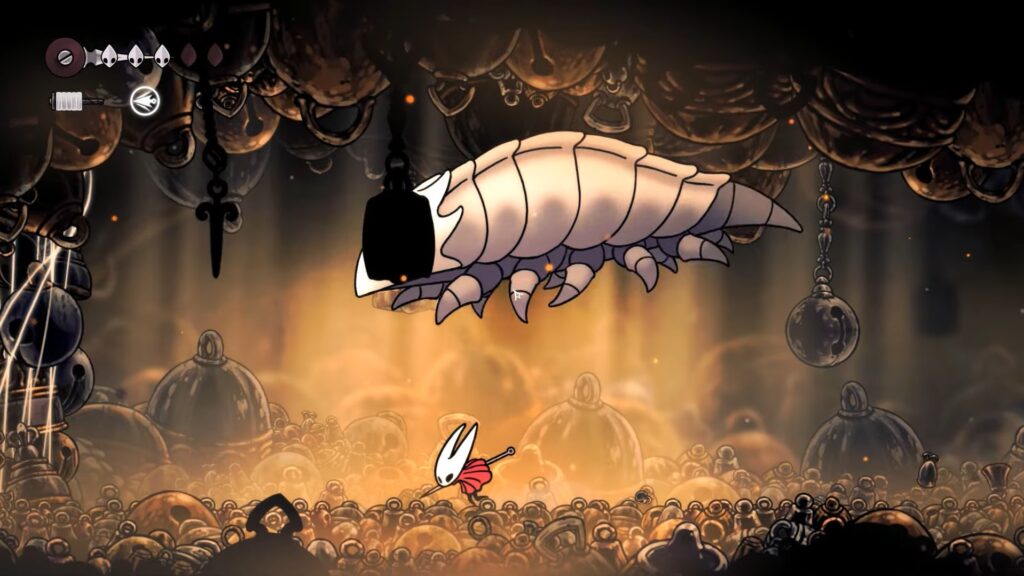
Bell Beast is the major boss in The Marrow and is located in the room filled with bells. Defeating this boss is not very challenging if you use the right strategy. The fast travel option between stations is not unlocked after defeating this boss.
Exit The Morrow
Move to the right to enter the next room after defeating the boss. Keep moving to the east and drop down at the end. Move into the next room by moving up a level. Again, you need to move down and keep running to the east till you find yourself in another room. A path will be created below, so move down and rest at the bench over there. Move downward after leaving the room.
Now, you will encounter a mini skull and a giant skill enemy. Use the platform to move upward and keep moving to the east. Make your way to the southeast after reaching a lava pool and continue moving east to enter Deep Docks.
That’s all you need to know about The Marrow in Hollow Knight Silksong.


