


Discover everything you need to know about the 10 best upgrades to get first in Pragamta, including what makes them crucial.
Upgrades in Pragmata are a core progression system that improves combat, hacking, survival, and overall efficiency. They not only enhance the damage, but also defense, mobility, and hacking abilities. You can purchase them using resources like Luna Filament, AI Cores, and Upgrade Components.
They are only applied at your base hub called the Shelter. It uses systems like Firmware Updater (stats & abilities) and Unit Printer (gear & mods). In this guide, we’ll walk you through the 10 best upgrades to get while progressing in Pragmata.
Best Upgrades To Get First
Upgrades don’t just increase stats, but also change how the game plays. The combat becomes easier & faster, hacking becomes less stressful, and survival improves. Choosing the best upgrades in Pragamta is essential to make your progression easy and dominate the enemies.
1. Auto Hacking
Auto Hacking is a late-game upgrade that lets Diana automatically complete the hacking mini-game for you. You don’t need to manually solve the grid, making it the best upgrade to get. Normally, hacking requires you to navigate a grid to reach an EXE node. This upgrade lets you skip that puzzle entirely during combat. Auto hacking works by consuming Diana’s Hacking Gauge to instantly finish the hack.
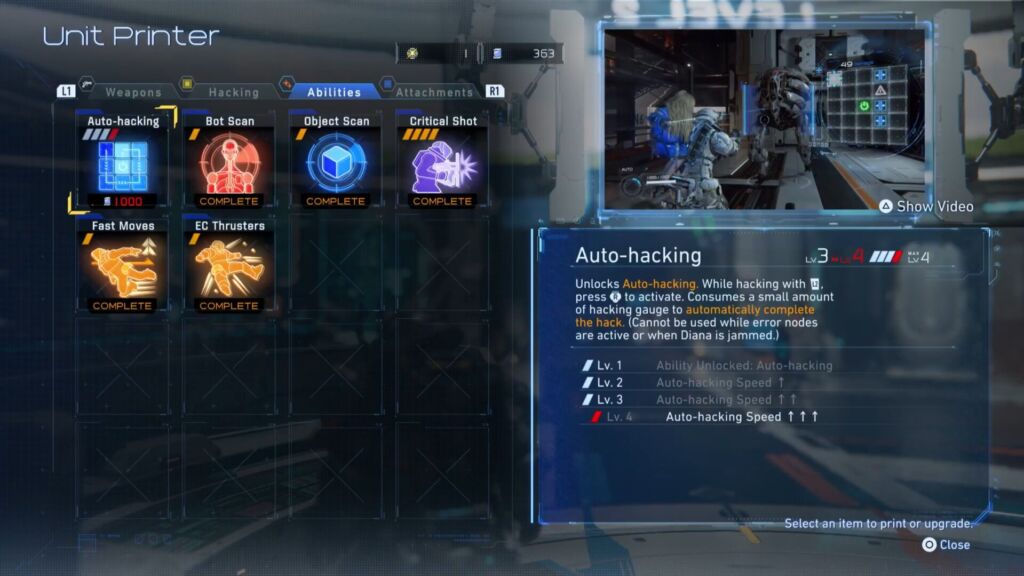
Auto Hacking Upgrade
You need to aim at an enemy to let the hacking grid appear. Press the right stick to auto-complete the hack instantly. You unlock this upgrade by completing Mass Production Array (Sector 2). Buy it from the Unit Printer in the Shelter using 1x Pure Luneum.
2. Object Scan
Object Scan is a utility upgrade for Diana that helps you detect and reveal nearby resources and items in Pragmata. It uses Diana’s scanning ability to highlight items on your map. Using this upgrade unveils Lune Filament, Upgrade Components, and Repair Cartridges. Activate Diana’s scan ability to see the nearby loot and materials on your map.
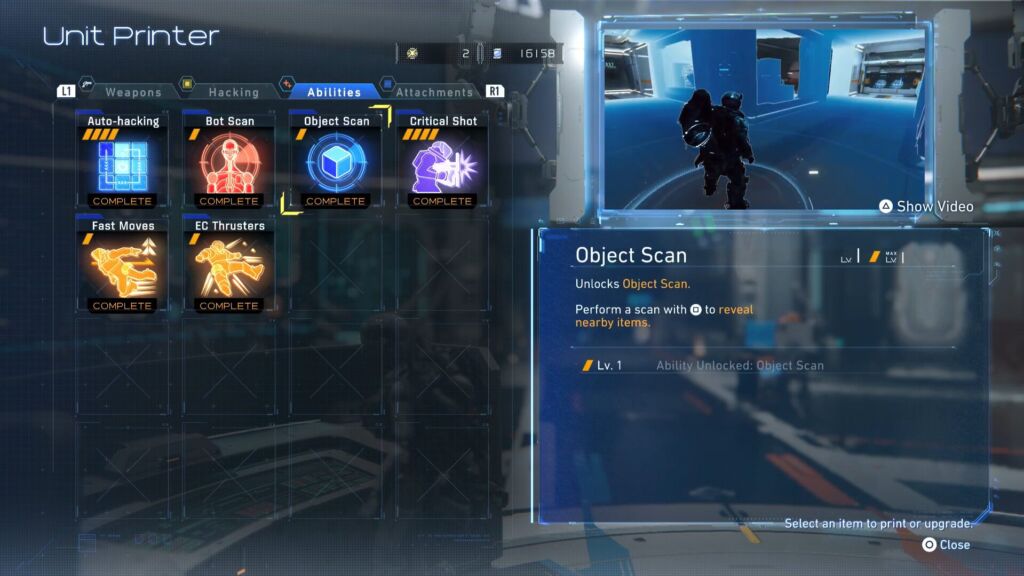
Object Scan Upgrade
Object Scan is crucial for resource farming, exploration efficiency, and finding secrets. It can help detect hidden areas like holo-walls and resource clusters. I recommend getting this upgrade quickly to boost your resource income and reduce the chance of being underpowered later. You can get it as soon as it unlocks in the Unit Printer or after upgrading your Shelter.
3. Additional Node Slot
You build a path through a node grid after hacking an enemy in Pragmata. This upgrade gives effects like damage boosts, stagger, and buffs. Use the Node Slot upgrade to increase the number of available node slots in your loadout and equip more hacking node types before a mission. It basically gives you more flexibility in how you design hacks and allows stronger combos.
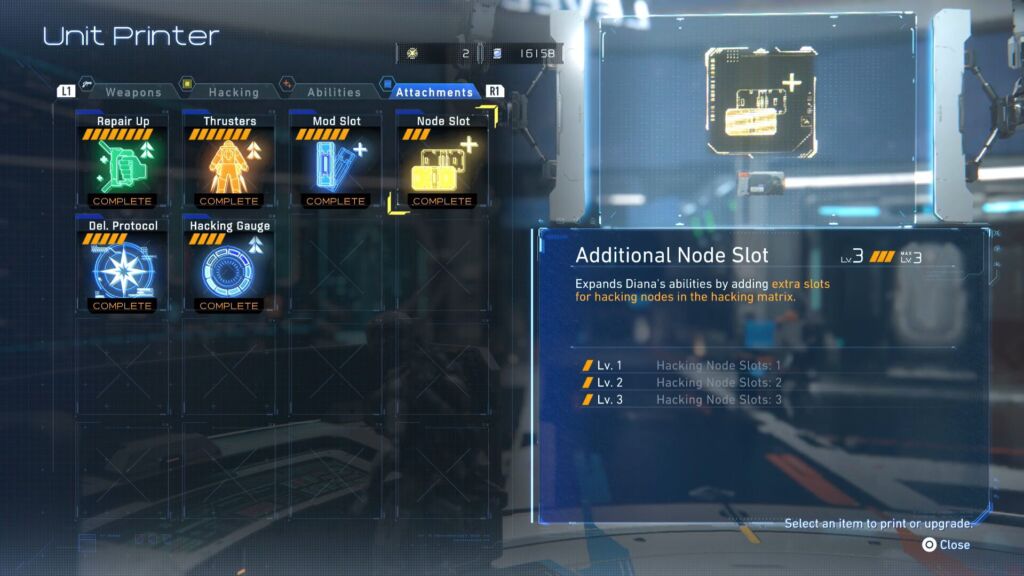
Additional Node Slot Upgrade
The goal is to have many slots available to store additional options during a run. It enables stronger builds and combos, allowing you to equip more hacking bonuses. Node Slot not only improves all hacking builds, but also makes other node upgrades more useful.
4. Strike Mode
Strike Mode allows you to open nodes that turn into strike nodes to deal massive damage. Your weapon damage increases, and enemies lose their armor when the hack is complete. These nodes increase general hack effectiveness and Open state duration. This upgrade gives special effects like damage boosts, lifesteal, or immobilization.
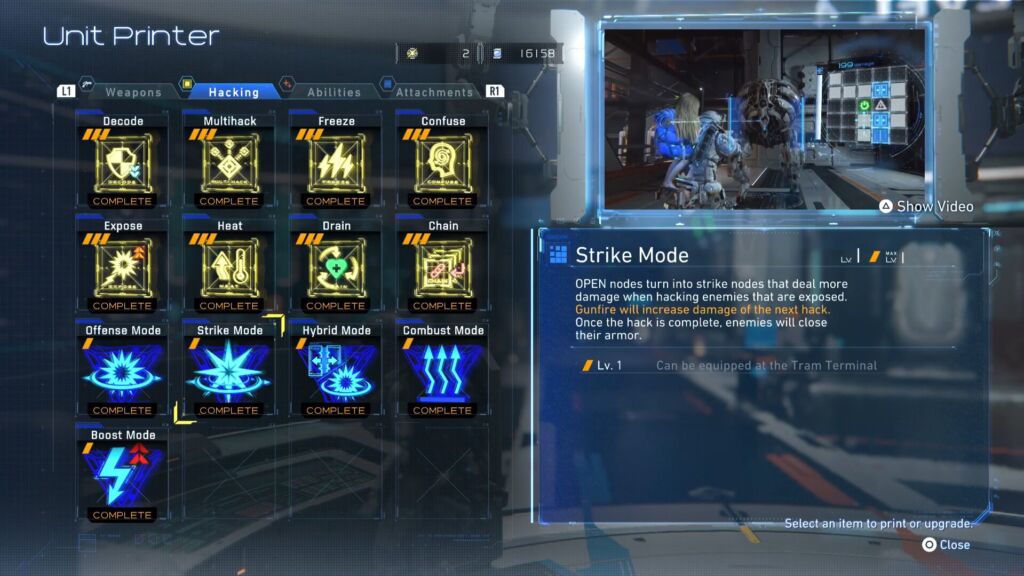
Strike Mode Upgrade
Use this to boost offensive output during hacking. You guide a cursor through a grid while hacking an enemy. If you pass through a Strike Mode, your hack becomes more powerful, and the enemy takes additional damage. The effect becomes stronger if you pass through multiple of the same type.
5. Critical Shot
The Critical Shot upgrade is a combat ability and is an essential one for all players in the late game. This allows you to perform a powerful finishing attack on weakened enemies after hacking them. You hack an enemy using Diana, making the enemy vulnerable. If the enemy is low enough in HP, a purple Critical Shot node can appear during hacking. The enemy can be knocked down if you route it successfully.
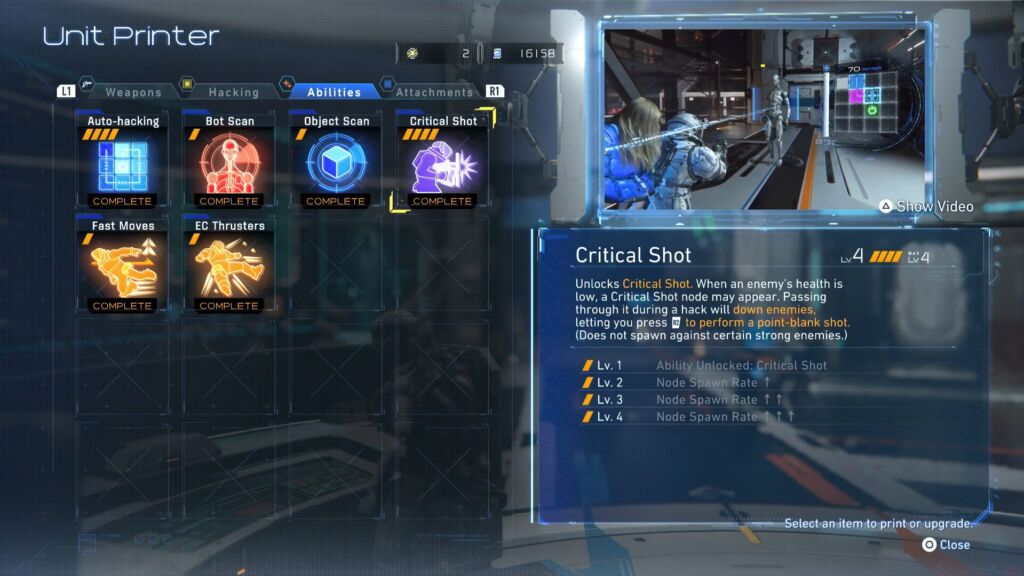
Critical Shot Upgrade
Make sure to rush in and press a button to execute a Critical Shot finisher. When triggered, Critical Shot, it instantly finishes weakened enemies and deals massive damage. Critical Shot is important because Pragmata combat is centered around hacking, opening enemies, bursting damage window, and finishing.
6. Multihack
The Multihack upgrade in Pragmata is a special Diana hacking ability that changes how you handle groups of enemies. It can hack multiple enemies at once instead of just one target and apply the hacking effect. This lowers defenses or exposes weak points to create a wide opening window where several enemies become vulnerable.
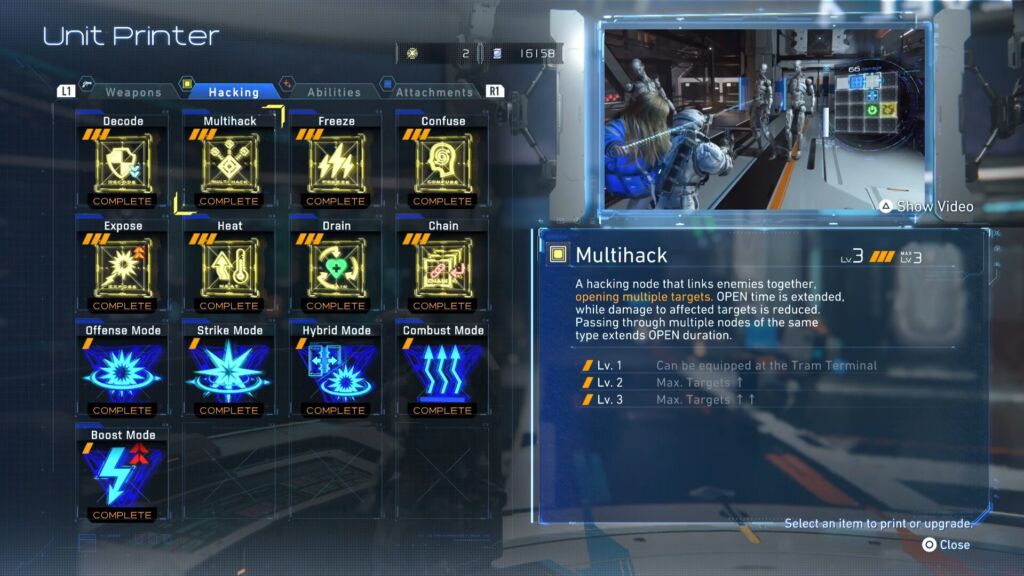
Multihack Upgrade
Normally, Diana hacks one enemy at a time, and you solve a grid to break its defenses. The Multihack is a hacking action that can affect a cluster of nearby enemies. This is very useful when you’re surrounded by drones or small bots. It reduces time spent hacking per encounter and boosts the burst damage potential. This is not always active permanently and requires timing to get maximum value.
7. Thruster Charges
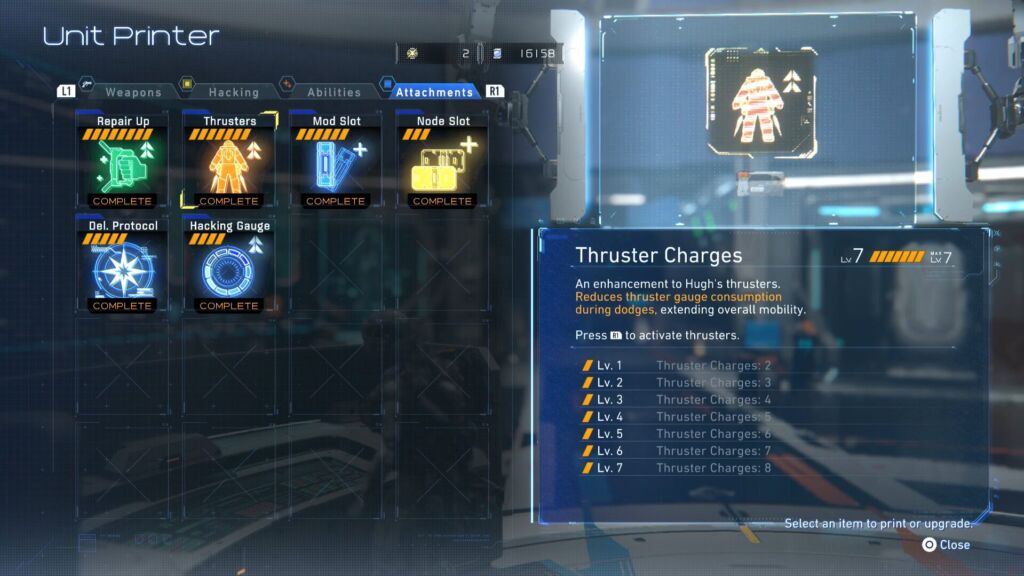
Thruster Charges Upgrade
Thruster Charges is a mobility-focused suit upgrade that improves how your thruster movement system performs. This upgrade is used for quick dodges, short bursts of movement, and avoiding enemy attacks. Thruster Charges allow you to get faster recharge of thrust energy, more frequent dodges, and better responsiveness. It keeps you mobile instead of locked in place and lets you reposition while Diana hacks enemies.
8. Confuse
Confuse is an effective upgrade that can interrupt enemy visual sensors. This upgrade lets Diana’s hack temporarily disrupt enemy AI behavior and make them lose targeting priority. It can also cause enemies to attack other enemies instead of you. Diana completes a hack on an enemy and applies a confusion status.
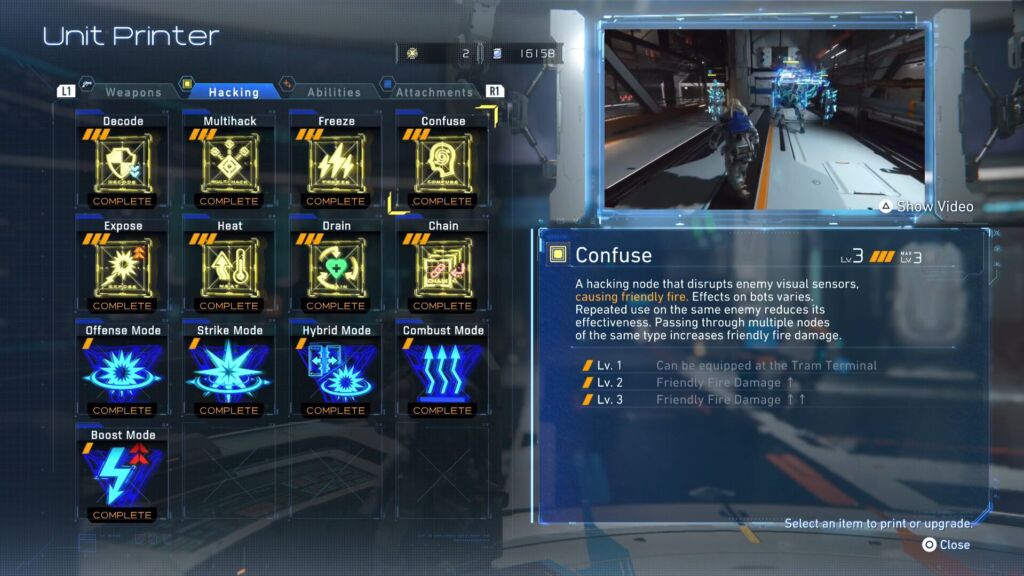
Confuse Upgrade
Let the enemy enter a temporarily disrupted state like wandering, pausing, missing attacks, or misfiring. This allows you to take down this affected enemy quickly. Confuse upgrade is great for crowd-heavy rooms and helps when you are outnumbered or overwhelmed. This gives breathing room to reload, reposition, or heal.
9. Additional Mod Slot
The Additional Mod Slot upgrade lets you equip more mods at the same time. Mods are equippable perks that give bonuses like better hacking performance, increased damage, and utility effects. You only have 1 mod slot at the start, so you need to go to the Shelter and manually equip mods into slots.
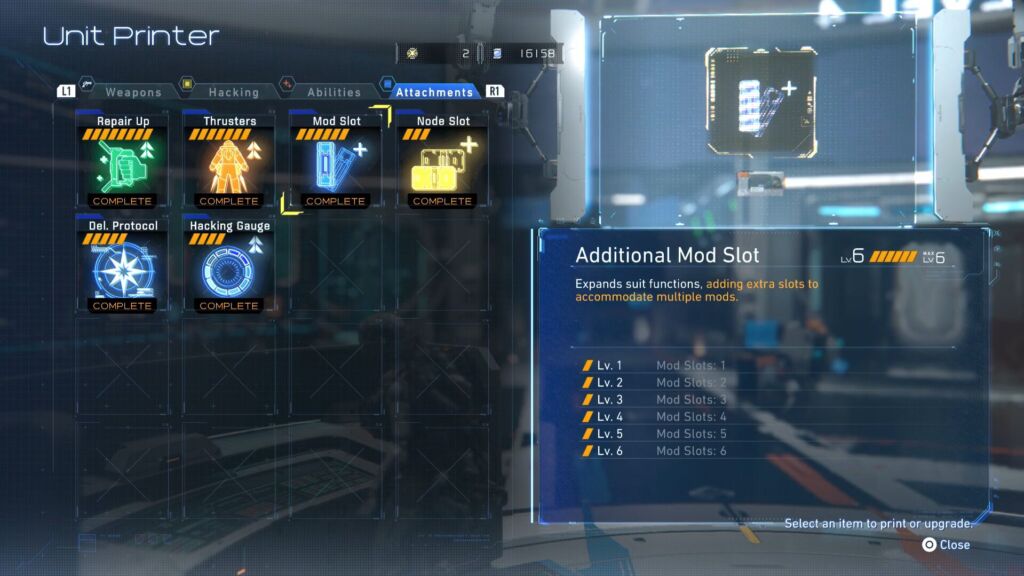
Additional Mod Slot Upgrade
Once equipped, mods are always active, and you don’t have to trigger them. Each Mod Slot upgrade adds +1 Slot, allowing you to stack multiple mods together. Going from 1 mod to multiple improves the survivability and boosts damage output.
10. Repair Up
Repair Up upgrade is a Suit enchantment that improves how effective your healing system is. This is an upgrade to your Repair Cartridge, which increases the device’s repair output. It increases the effectiveness of Repair Charges and makes each heal give more HP recovery value.
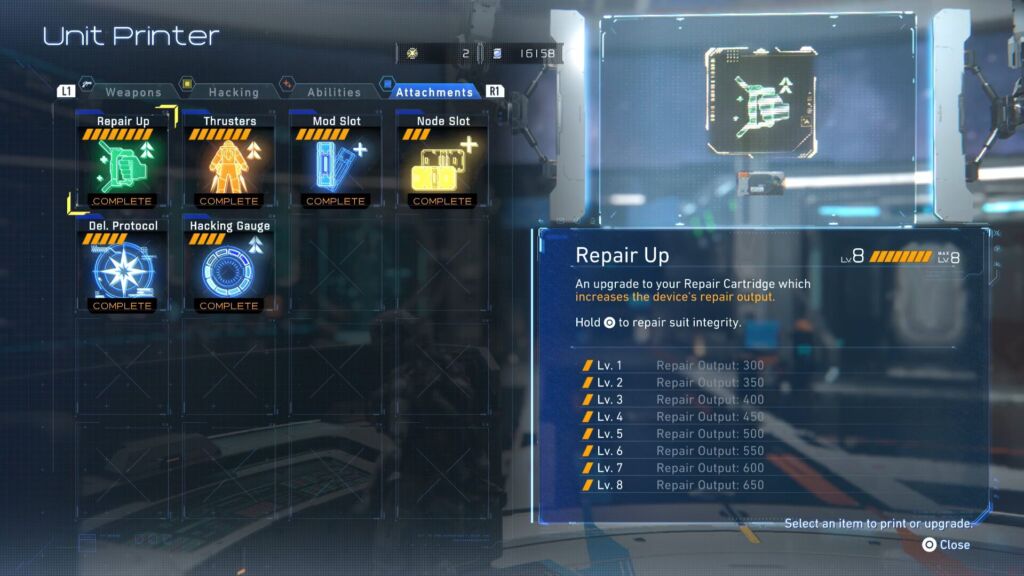
Repair Up Upgrade
Prefer this upgrade to survive longer since enemies deal heavy damage in most fights. You collect or earn Repair Charges during exploration, making each charge more efficient and valuable. Healing items are limited, and Repair Up makes every heal count more. Pressing the O button on the controller lets you repair suit integrity.


